
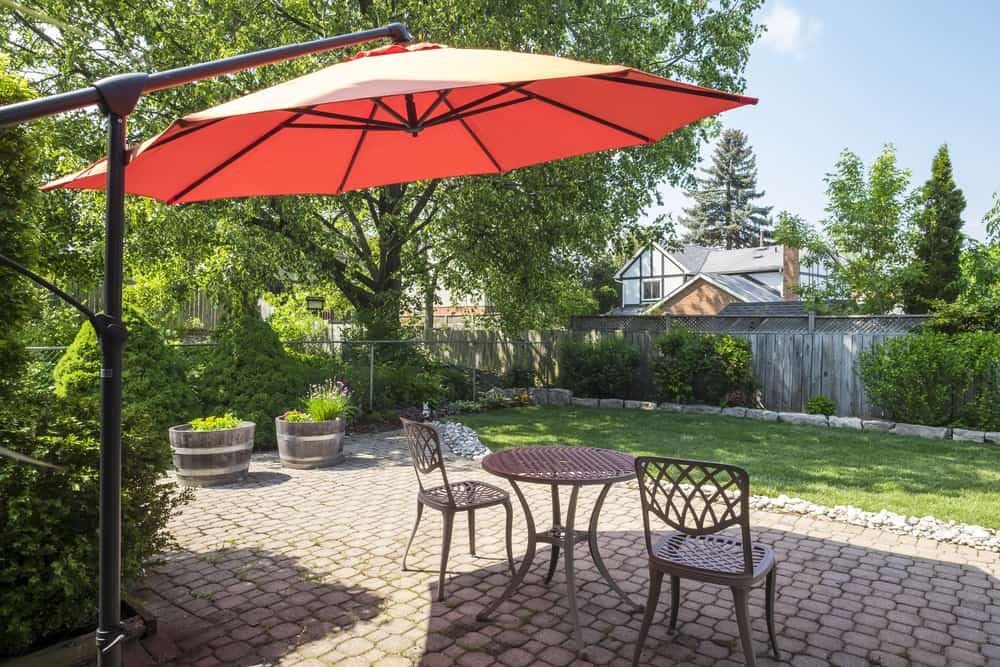
How To Replace a Cantilever Umbrella Canopy
Cantilever Umbrellas will need to be replaced just like any other canvas. How do you replace the canopy on a cantilever umbrella?
Some models of cantilever umbrellas can be a downright pain in the neck to get back in working condition. Some extra poles and adjustments will need to be made during the process that make you want to rip your hair out. Don’t sweat it! Read on and learn what it takes to replace the canopy on a cantilever umbrella.
Replacing the Canopy on a Cantilever Umbrella
Let’s face it. After a few seasons out in the sun, your umbrella isn’t looking that great. There could be rips and bits of worn fabric that allow the sun’s rays to intrude on your family breakfasts. If you have a cantilever umbrella, one that folds away from the main post as opposed to on it, it can look like a daunting task.
Round up the Tools You Need to Remove the Canvas Without Damaging it.
You will need a screwdriver and a ladder. That’s all. People often focus on the umbrella’s weird action and not how similar it is to a standard one. Don’t let all the moving pieces distract you from what is a simple and straightforward job. Keep the ladder opened and a few feet away while you inspect the canopy with your screwdriver.
When searching the canopy, you should look for a few major anchor points attached with screws. These are usually close to the primary arms and are reinforced with extra padding between the fabric and the screw receptacle. Pay attention that the screws aren’t stripped before you move on to the next step. Stripped screws mean you cannot attach a new canopy.
Remove the Canopy with a Screwdriver and Some Patience
When the companies design the umbrella canopies, they focus on attaching them to the umbrella’s frame. There will be pockets and bits of velcro that will connect the canopy to the skeleton of the cantilever. Go around each arm of the structure and remove what you need to make the fabric hang freely from the poles.
There could be more attachments than a sane person would ever design on an umbrella. Keep in mind that all the branches will have to be reattached in the final step. Remind yourself how the pieces attached and if they needed to be threaded through bits of the frame. In fact, grab your camera or phone and take pictures. This will be a big help when putting it all together in the last step.
As an Amazon Associate I earn from qualifying purchases.
At the top of the canvas will be a zipper. This zipper opens to allow the canopy to be hung from the central hub in the center of the umbrella. Unzip the zipper, and it should fall away onto the ground.
Bundle the Arms of the Umbrella for Easy Reinstallation
There are several arms on the cantilever umbrella. You should use something like rope or packing tape, to keep the arms in a manageable position. It will be a godsend when you begin to rehang the canopy as the arms can snag pieces of the fabric and make it a heck of a job to stretch the canvas back over.
Ensure that the arms are immobile, as nothing could be worse than setting the canopy only to have the umbrella open while you are trying to install it. Bind up the moving mechanisms if you feel that there is a chance of that happening. Take time and ensure that you don’t hurt the action of the arms by pinning them down. Movable arms are what make the umbrella work.
Attach the New Canvas on the Umbrella Frame
Be sure to take your time in this step because if the fit isn’t correct; the umbrella could fail to open or rip during the process. The key is to make sure that all the velcro and pockets, places for the end of the frame poles, are fitted and working. Your umbrella might not have pockets but make sure that the ending rods are connected to the canvas.
The most significant part of this step is ensuring that the zipper portion covers the umbrella’s central hub. It must fit snugly and sustain the weight of the canvas. If the canvas slips or isn’t positioned correctly, it could mean more work for you and damage to the frame. Zip the canvas all the way, and don’t leave any fabric loose.
Before opening the umbrella, make sure that each and every bit of velcro is in use, and the pockets are secured. Each and every arm should have connections to the canvas, and if they don’t, now is the time to fix them.
Unleash the Frame Poles of the Umbrella
In an earlier step, you bound up the poles to prevent the new canopy from being ripped or snagged during installation. If you did a good job, there should still be plastic or twine wrapped around the frame’s arms. Go around and remove what you used to bind it; making sure that there are no attachments that could keep it from opening.
If you have to use a sharp edge to remove the bindings, make sure that you don’t cut the canopy or any velcro attachments inside. Weakening the canvas and velcro could mean that wind will rip the canopy, forcing you to endure the entire process over again. Be careful with sharp edges around any type of canvas covering.
Raise the Umbrella and Make any Missed Connections
Once the canvas is secured, and the frame is unbound, you can raise the canopy. It should go up smoothly and not bind around any of the moving parts; if there is binding, stop raising the canvas and inspect the problem. Often the canopy will be bunched and could cause the mechanism to get caught up. Remove any obstructions before opening the umbrella fully.
Once the umbrella is fully opened, you should move around the underside and check the frame for loose connections. One of the biggest hurdles for this part is being able to reach the velcro. Use your ladder to go down each of the arms of the frame and ensure that the connections are made, and nothing is left dangling.
Keep the Canopy Open for an Extended Period of Time
Now that you have your canopy attached, you should leave it up for a while to see how it is affected by the elements. If the wind is whipping, the canvas will get a good testing. If there is no wind, try and use a leaf blower to simulate high winds or storms. Leaving the canvas open will let you know if there are any holes or if the velcro needs to be reinforced.
Conclusion
Reinstalling a canvas on your cantilever umbrella will seem like a daunting task. The reverse nature of the frame and how it closes can make people overthink the situation. Start from the top and work your way down to ensure that all the connections are made, and each of the frame arms is attached to the canvas.
Testing your umbrella in a real-world scenario is very important to the process. You should try the canopy out before allowing anyone to sit under it or place any furniture. If it is attached incorrectly, it could whip off and be flying through the neighborhood before you have a chance to fix it.


Sheehan 9’8″ Lighted Cantilever Umbrella
Had bought this umbrella and it is discontinued. Anyway you guys or ladies know which canopy would be the right replacement?
Hi Matthew, thanks for the question. I would call the umbrella company first to see if they have replacement canopies. If they don’t, find a company that makes replacement canopies, like this one https://www.shadeusa.com/product-category/patio-umbrella-parts/umbrella-replacement-canopy/. Call and ask specifically about your company umbrella size.