
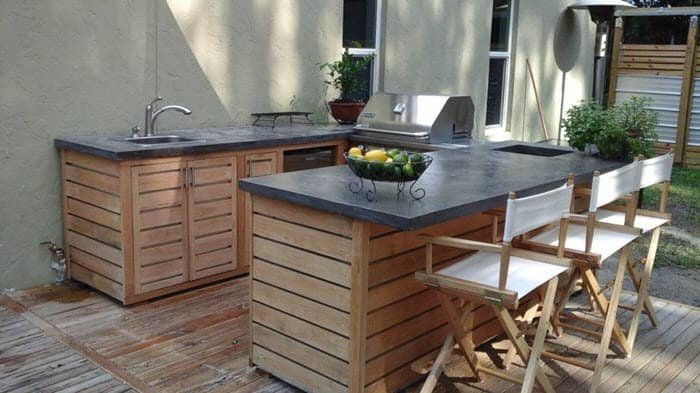
How To Make Concrete Countertops For Your Outdoor Kitchen
We created concrete countertops for our best friends’ backyard a couple of years ago and we’ll be working on the project for our backyard this summer.
So we thought we’d share the process of how to make concrete countertops for your outdoor kitchen.
Step-By-Step Instructions for Making a Concrete Countertop Outdoors
Each step in this project is almost like a project of its own. If you really want something amazing out of this project, then you should be prepared to put the time in to do it right.
Install the Base for the Countertop

A favorite aspect of concrete countertops is the customization of concrete. This feature also means there is no single way of installing the countertop frame.
For cast in place counters, you can purchase molds to install act as framing lips for your concrete countertop mold, or you can also use pieces of melamine-coated boards to create a DIY mold!
As shown above, I used 1×6 boards for my outer mold 2 inches tall from counter, making sure they were level with each side so the concrete would be level when poured to the top.
I used 3/8 pvc board as my base for the new countertop. Our friend’s counter has 3/4 exterior plywood as the base. I used drywall screws to install the pvc base to the wood frame.
As an Amazon Associate I earn from qualifying purchases.
To make an overhang on the front and sides of your cabinet frame you need to attach (1) 1×4 board on each side as well as (1) 2×4 on each side flush with your cabinet frame, not the pvc board. This will give you a total of 2.25 inches overhang and hide the PVC.
The reason behind using both boards is that once the 3/4 inch cabinet face frame boards are attached, it will leave a 1.5 inch overhang.
If you are casting your concrete countertop with your face frame attached, it may be better to use pre-made forms or you could damage your cabinet face frame.
Once your overhang boards are attached, you can now attach your 1×6 boards being careful to level them on all sides for level concrete. The minimum recommended thickness for concrete is 1.5 – 2 inches. I went with 2 inches.
After installing your frame, you may find it helpful to caulk where the base edges meet the 1×6 boards to seal any cracks. You don’t have to worry about being messy with the caulk, as no one will ever see it!
Sink Cutout for Cast In Place Concrete Countertop
You have to build a frame on top of your sink cutout for the concrete. I attached 2×4
Prep for Casting the Concrete
Before you pour your concrete, you will be placing mesh and/or rebar into your frame to prevent the concrete from cracking.
You can use wire mesh or fiber mesh. When you use wire mesh, pouring the concrete over it ensures structural durability and improves its strength. If you use fiber mesh, it increases overall integrity. We used the steel wire mesh sheet you find in the concrete area of Lowes, that cuts easily with tin-snips.
You should also take this time to cover the areas surrounding your project to protect from concrete spillage. Be it with plastic or some other protective layer, you will want something to shield your belongings from the concrete.
I just built the deck underneath and the cabinets under the counter so we used lots of plastic to protect everything. As you can see in the pic below, concrete got everywhere, but the plastic saved the day.
Mix the Concrete Thoroughly
When you’re ready to mix concrete, you have a few options for doing so. Using a wheelbarrow/mixing pan method to mix by hand is easy for smaller projects. We were able to dump the concrete out of the mixing pan on top of the form for easy spreading.
Every bag of concrete has a different ratio of concrete mix to water to make the product efficient. Therefore, there is no specific formula for making concrete and you need to consult the instructions for your particular brand.
It is crucial to have the right proportion of water to concrete, or your may be risking your entire project. Having concrete that is too soupy will be messy and not strong. If the concrete is too dry, it won’t stick properly.
Take your time mixing to ensure you don’t make your mix too thick or thin. We used Quikrete Countertop Concrete Mix 80 lb for our project. It has special additives to help it flow better and to minimize the air pockets. It was worth the extra money as our countertop came out perfect.
Carefully Pour Concrete In the Mold

Once you’re finished mixing your concrete, you’re ready to pour it in the forms. As mentioned earlier with a couple of strong people, we dumped the concrete from the pan straight on top of the form.
We spread out all the concrete over the entire form to about half thickness then placed the wire mesh on top of the concrete. We then continued to spread the concrete all around the forms until it was at the top of the forms.
As the picture shows above, we screed the concrete with a vertical 2×4 raked across the 1×6 forms to level everything and remove excess concrete. Having a leveled framework comes in handy for this as you can drag a long enough flat object over it to make it completely flat.
Remove All Air Bubbles
Once you have screed – or flattened the surface of your concrete mix you will need to work on removing air pockets. Failing to remove these air pockets can seriously harm the integrity of your countertop and your edges will have gaps from the air bubbles.
To remove the air bubbles, you can tap the sides and bottom of the mold with a hammer. This will work the bubbles to the surface, eliminating them from your mix. You can also use any tool that vibrates on the side of the concrete frame, such as sanders.
If you are ok with spending a bit more money then you can rent a special tool called a concrete vibrator made for this exact purpose.
The concrete vibrator does exactly what it sounds like—vibrates the concrete mixture in a controlled way so the air bubbles can escape to the surface. It can certainly save you a lot of headache so it’s probably worth renting one and doing it right.
Our friends had a few hand held sheet sanders that we used to vibrate the bubbles out of the concrete. Take off any sandpaper and simply hold the vibrating sander head to all areas of the 1×6 form.
Let Your Concrete Cure
After you have taken the time to remove air pockets and smooth the surface of your counter, you can leave the concrete to cure. While the entire curing process takes about a month, you don’t have to wait that long to remove the mold.
While you can leave it on there for as long as you feel comfortable, you can also remove the mold/frame after a few days of the concrete setting. While there is no guarantee two concrete batches will be the same, each concrete brand should give an estimate on when your concrete is cured enough to stick together.
Remove the Frame to Finish Curing
After around 48-72 hours, you can be confident in removing the frame without damaging the concrete. While full curing of your concrete may not be completed for up to a month, the concrete will still be solid.
The exact method you will use to remove your framework depends entirely on what you used to secure the frame in the first step. I used screws so the framing would be easy to remove.
Your countertop may not seem perfect, but that’s ok—there are still some finishing steps to put the literal polish on it.
Make Necessary Changes and Sand

When the framework has been removed, you are free to adjust your project as you please. You could remove parts, make any cutouts you need, adjust the shape, or any other big changes that might need done.
After any changes, you also need to sand it. There are special concrete sanding discs that will help round off your counters’ corners to prevent injuries. In the picture above, the right side of the counter was sanded, while the left side with sink was how it originally looked after removing the frame.
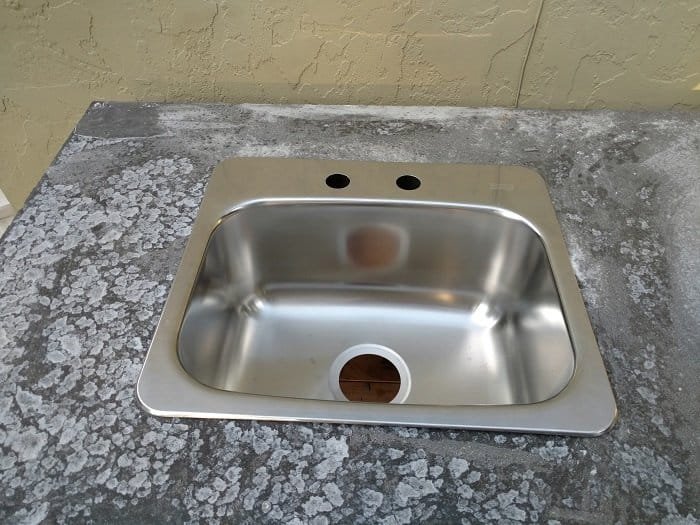
If you notice any holes or surface voids, you can mix a tad more of the concrete mix and fill the gaps. Give it time to cure again and then sand it down to ensure that smooth, clean finish. There was a hair-line crack in the front of the sink that we had to fix. I believe it was due to not having enough wire mesh around the thinnest part of the countertop and will make sure to double the amount of wire I put in my next concrete counter.
Seal the Concrete
When you finish sanding your project, you can add an extra layer of protection by sealing the concrete. Concrete seals offer different finished appearances for your counters, so you have some customization choice at this stage.
Simply find a seal you like and follow the instructions from the manufacturer. Each seal has it’s own application and cure times, so you’ll need to consult the manual for the specific one you purchase.
Sealing your concrete countertop properly protects them from the weather, any potential scratches, and food stains. Remember, concrete is very porous, so it’s also crucial to seal it properly, especially in a kitchen setting where bacteria can breed easily in the porous, untreated concrete.
The last thing you want is for your hard work to be ruined the first time you spill BBQ marinade on it!
Creating a Concrete Countertop for Your Outdoor Space
Once the last coat of sealant has dried, then: congratulations! You now have a stunning centerpiece for your outdoor kitchen.
As time goes on, just remember to keep an eye on the sealant and watch for any chips or cracks. Depending on your climate, level of use, and the type of sealant you used, you may need to reseal every season or every few seasons.


Hey, I gather you leave the base plywood in place?
Hi James, thanks for the comment. Yes, we left the plywood in place. Since this was outdoor, we actually used exterior rated plywood. We just built a new countertop and used a PVC 4×8 panel underneath. It’s more expensive than exterior plywood, but is more stable and will never rot.
What type of sealer is used ? To protect the countertop ?
Hi Cindy, thanks for the question. We’re actually struggling with this question right now as well. I sealed the first concrete countertop with a quikcrete sealer that I bought at Lowes. I can’t find that product anymore and have to seal my new concrete countertop. Right now I’m debating between the ghostshield concrete sealer or the Cheng concrete sealer as both have great reviews.