How To Paint a Fence
Painting a fence is a DIY task that looks easy, but it can end in disaster if you don’t follow the right steps. Knowing how to paint a fence is the best way to ensure the final product turns out just right.
After building a fence, many people like to paint it to add a little more color to their backyard.
If you want to paint a fence, you’re in luck because here is a guide of the dos and don’ts involved with painting a fence. Keep reading to find out how to successfully paint a fence that will definitely impress the neighbors.

Choose the Paint
One of the biggest questions people ask when painting a fence is the kind of paint they should use. For the most part, the type of paint you can use is a personal choice; however, there are some things to consider when deciding what paint to buy.
The best fence paint should prevent mold, prevent the wood from rotting, and prevent rust if you have a metal fence.
Some of the best fence paint brands are more eco-friendly, ensuring your painting project will be safe for you and the environment.
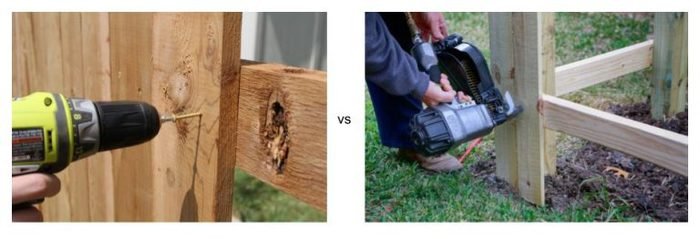
Paint vs. Stain
The big question people always ask us if they should stain or paint their fence? The answer depends on the kind of fence you have and where it’s located. Here is a short list comparing the two to help you decide which type of paint works best for you.
As an Amazon Associate I earn from qualifying purchases.
Painting a fence comes with advantages and disadvantages. Up next, we’ll weight the pros and cons of painting:
| Pros | Cons |
|---|---|
| Lasts longer than stain | It usually requires two coats of primer. |
| Variety of colors | The paint is permanent and cannot be undone once you paint your fence a specific color. |
| Great for filling in cracks or blemishes in the wood. |
And now for the pros and cons of staining a fence:
| Pros | Cons |
|---|---|
| Stain soaks into the wood for more natural look | Will need to be re-stained more often |
| Variety of colors | Staining your fence does not fill in cracks or blemishes in the wood. |
| Easier to re-stain than reapply paint |
Staining a fence requires preparation beforehand. It is advised that you wash or power wash the fence before staining. In the end, both paint and stain will help your wooden fence to last years longer than it would have without being polished over. They both repel water and protect against UV damage.
Prepare for Painting
There’s much more to painting a fence beyond slapping on a coat of paint or two. Preparation is an essential step in painting a fence and achieving the best-finished product.
Before painting, you want to make sure you have everything you need to paint your fence successfully and that your fence is ready to be painted.
Clear the Area
I know you are eager to start painting. Even so, before you start painting, take a moment to clear your surrounding area. Move your children’s play slides, portable pools, or dog house. If you have a plant nearby, place a piece of plywood between them and the fence.
Prime the Fence According to the Paint You’re Using
Before you decide what paint to use, you will need a primer. When deciding what primer to use, make sure the primer is safe for outdoor use and does not contain chemicals deadly to local ecosystems.
The paint you choose will be entirely up to your preference. Just make sure to select paint that is safe to use on wood, like oil-based paints.
Take time deciding what paint you want for your fence as some paint cannot be undone, and no matter how many times you repaint, it may never look as good as the first time.
Scrape Away Any Imperfections
Use a paint scraper to remove any old paint that looks out of place. You want to make sure to remove any splinters or rough spots by sanding them down. If possible, scrape away any imperfections that you can see. The smoother your fence looks, the more excellent it will look after being painted over.
Make Necessary Repairs
On top of removing any imperfections, you want to make certain your fence is in top shape to be painted. This could mean tightening a few bolts, removing any loose nails or broken boards from the fence.
Give your Fence a Bath
After removing small imperfections and doing repairs, your fence might be a little dirty. To clear debris from your fence, grab a fence cleaner, spray cleaner, brush, or rag, and start scrubbing.
If your fence requires a deeper clean, power washing is an effective method to eliminate pesky grime like mildew.
After washing your fence, you want to make sure to let it dry before attempting to paint. If you live in an area where the weather might be an issue, make sure you do this when there’s no rain in the forecast. Or if you’re in a humid climate, allow extra drying time.
Protect Against Overspray
No one likes having to walk out in their backyard only to find spray paint flying over from the neighbor’s yard and into their yard.
Overspray occurs when more paint is applied than required. That extra paint being applied usually splashes off into your yard drips onto your patio, or leaves a dust-like appearance on your fence.
No matter if you are painting your fence by hand or with a paint gun, overspray is possible. You can tell if your fence has been a victim of overspray if you find small stains that look like dust and hard to the touch.
Clean Your Environment
It is best to move any outdoor furniture or nearby possessions out the way. Even if you feel confident in your ability to control overspray, it is best to remain safe than sorry. It is recommended to move your furniture at least 15 yards away to prevent any drop of spray paint from getting on your furniture.
Use a Canvas Drop Cloth
If the painting’s fence is located on a patio, then using a drop cloth or something similar is recommended. The fabric is there to catch any paint that manages to fall onto the patio floor.
Use the Right Pump Pressure
You want to make sure to use the right pump pressure for your paint gun. Using the max pump pressure settings will result in the gun sending out more paint than needed and potentially cause a lot of oversprays.
Use Masking Tape and Paper Sheets
If your fence is nearby windows and doors, then you might want to use masking tape and paper sheets to cover them. Use masking tape on doorknobs so that if overspray does occur, the tape will catch the paint for you.
For windows, you can use sheets of paper or newspaper to cover them. It is crucial to find paper large enough to cover the entire window. If you don’t have a large piece of paper, you can use multiple small newspapers and tape the newspaper’s edges to the window.
Once you have taken the precautionary measures to prevent overspray, then you are ready to start painting. Don’t forget to checkout our other fence articles such as how to remove a fence post and the cheapest fence to build, and much much more!