
Which is Better: Staining or Painting Pressure Treated Wood?
Pressure-treated lumber has been a godsend for exterior projects by extending the life of wood beyond its natural lifespan in harsh outdoor conditions. But that same process that gives wood its preserving properties can wreak havoc on stain or paint jobs when done improperly. This raises the question of which material is better to use on pressure-treated wood: paint or stain? And how can you apply it without having to watch your hard work come undone in short order?
Experts recommended that you stain pressure treated wood rather than paint it. The primary reason for this is that paint rarely adheres to pressure-treated wood very well because of the process used for the pressure treatment.
However, as we will explain later, it is possible to paint pressure-treated wood if you take the proper steps. The key is understanding what makes pressure-treated wood unique as a category of lumber and how to work with it effectively.

Table of Contents
Can You Paint or Stain Pressure Treated Wood?
Pressure-treated wood is wood that has undergone a process in which an enormous amount of pressure is applied to inject a solution of water and preservative chemicals deep into the wood grain. This solution is designed to protect the wood from rot and extend its lifetime. This makes pressure-treated lumber useful for outdoor settings like decks and fencing, where it will be exposed to weather and moisture regularly and would otherwise decay quickly.
However, this pressure-treatment is why a stain or paint job can fail much of the time. Wood that has been pressure-treated is always wet immediately after the process, and it remains wet for weeks in most environments. The wood needs to absorb a stain to be effective, so it needs to be dry before staining.
In this article we talk in more detail about how long to wait before staining a pressure treated wood fence.
As an Amazon Associate I earn from qualifying purchases.
For similar reasons, wet lumber can hinder how well paint adheres to the wood, but the added problem of the preservatives in pressure-treated wood makes it difficult for the paint to bond; this is why it’s advisable to stain pressure-treated wood instead of paint, as painting requires additional preparation.
What Types of Pressure-Treated Wood Are There?
Pressure-treated wood falls into one of two basic categories, above-ground and ground-contact. The picture below shows the two different types of pressure treated wood and the color difference between the two. These different types of pressure-treated wood are distinguished by how and where they are used, but the steps to prepare them for staining or painting are the same.

Above-Ground Pressure Treated Wood
Above-ground wood is intended to be used in areas where the wood is easily accessible and can be replaced or maintained with little trouble. Builders use this type of wood where it will be at least 6 inches above ground level. Also, the wood should be well-ventilated and allowed to drain when it gets wet.
Above-ground wood can be used as deck rails or deck boards if they are easy to reach or replace when needed. In the picture, all fence slats, as well as the top beams, rafter and arch of the pergola gate, are above ground.
Ground-Contact Pressure Treated Wood
Ground-contact wood has been treated to keep a more generous amount of preservative than above-ground wood. It is therefore suited for above-ground applications or situations where it will be in contact with the ground. Some ground-contact wood uses would be fencing where the fence posts are in-ground, as is the posts in the pergola gate above.
When your project involves wood being less than 6 inches from the ground, or where it may be poorly ventilated and challenging to maintain or replace, you need to use ground-contact wood. Home Depot is starting to carry more ground contact 2x material as well as ground contact wood decking.
How to Stain Pressure-Treated Wood
Pressure-treated wood can be stained rather easily. However, you need to be mindful of when you stain the wood since doing so too early can cause your stain to be “rejected,” causing your work (and money) to go to waste.
Here are our recommendations for the best stains for pressure treated wood. Whether you want to use a water based or oil based stain, use the following steps to ensure your efforts are successful.
Test the wood to see if it is ready.
Pressure-treated lumber is often wet when you first buy it, and if it is, you won’t have any success in trying to stain it immediately. Wet wood cannot absorb the stain properly. However, you may stain immediately if you have kiln-dried pressure treated wood.
Check if the board has a stamp or a tag that reads “ADAT” (air-dried after treatment) or “KDAT” (kiln-dried after treatment). This type of lumber can be stained immediately (provided it hasn’t gotten wet since you purchased it, such as being out in the rain).
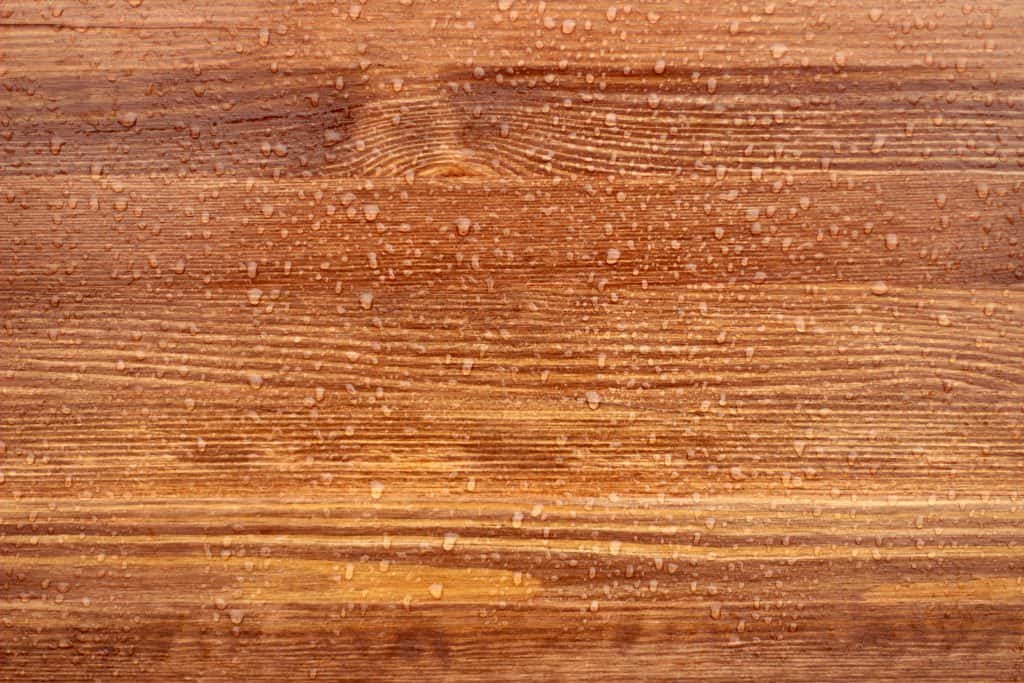
To test if the wood is ready to be stained, use the “sprinkle” method. Sprinkle some water onto the wood, and then time how long it takes for it to be absorbed. If the water is absorbed completely, you are ready to stain. Wood that is not ready will pool or bead the water on the surface, signaling it still retains too much moisture.
Wash the wood to clear dirt and debris.
If the wood is brand new, then you don’t need to worry about this step, although a wash won’t hurt your efforts. If you are staining wood that has been installed for a while, then it is essential to clean the wood before staining to get rid of dirt and other debris that can interfere with the stain.
It’s a good idea to apply a cleaning solution to the wood to loosen up the material you want to wash away. You should let this solution soak in for at least 10 minutes, but follow the directions on the container. We showcased how to clean a wood fence without pressure washing using different methods.
Afterward, rinse the solution off with a garden hose or a pressure washer (especially if there are tough stains). Then, wait at least 24 hours for the wood to dry (and since the last rainfall) before treating it with the stain.
Prepare the wood one last time.
Prepare the area by sealing off with painter’s tape or a tarp so you can avoid getting stain where you don’t want it (such as patios, furniture, or house siding). Sweep the wood with a broom to clear off any leaves or dirt that may have collected while the wood was drying.
Apply the Stain to the Wood
After opening the container of stain, stir it well to ensure the color is even throughout, and pour some into a paint tray. Start by applying a small amount of stain to a patch of wood and confirm that you are comfortable with its appearance.
This is your last chance to change your mind, so don’t rush this. Once you’re ready to commit, start staining the wood. After you are done, let the stain dry for at least 24 hours before walking on it.
The recommended tool for applying stain is a paint pad applicator. You can attach it to a pole for easy application without having to bend over. You can also use a roller to stain a deck, which will be a lot faster.
You could use a brush, but on a deck this will be slow and uncomfortable since you will be on your knees much of the time. Instead, use the brush for staining between cracks or deck boards and any other challenging areas to reach.
How to Paint Pressure-Treated Wood
As we mentioned earlier, it’s recommended that you stain rather than paint pressure-treated wood. However, if you follow a couple of steps, you can get an excellent result from painting as well:
- First, make sure the wood is completely dry before you paint, and then prepare the wood as described in the steps above on how to prepare for staining.
- Then, use a bristle brush to apply a coating of primer to the wood. This primer should be engineered for use on pressure-treated wood.
- After the primer has dried, apply two coats of latex paint to the wood. You may need an additional coat of paint or more to get the best results.
If you’re wondering if you can use indoor paint outdoors, check out our article to explain why it isn’t a good idea.
Final Thoughts
Pressure-treated wood requires some consideration when planning a new project or restoration of existing wood, but thankfully, it doesn’t need to be a frustrating experience to stain or paint.
As long as you follow the steps given on preparing and applying stain or paint, you should have a great-looking result that can last for years.


Thank you for the insight on painting or staining pressure treated lumber. Especially on the designation as to whether it was air dried or kiln dried. It is always good to learn something new no matter ones age.
Assuming you do staining and painting correctly, which lasts longer?
Hi there and sorry for the delay in responding to your question. At my house which is located in Florida, I stain my pressure treated wood. It seems to last longer than paint in our very wet and humid weather. If you live in a drier climate then there might not be much difference. Jena