
How To Build Deck Railing

Adding a deck railing to your backyard deck provides additional safety even if you have a lower level deck. It also gives a deck a defined and distinctive appearance. Whether you’re adding a railing to an already built low deck or you are replacing railing, you need to know the proper building steps.
A DIY deck railing projects also give you the flexibility of customizing it to your liking. New DIYers often struggle with how to build deck railing that is structurally sound and will pass local building codes.
National building codes require a deck railing if a deck is higher than 30″ from the ground. A deck rail must be at least 36″ high. The interior rail section can not allow a 4″ sphere through any point, including underneath the bottom rail to the decking.
Now that you have the criteria for your deck railing, you can start figuring out what style you want. We’ll take you through the steps to build your deck railing below.
What’s the Process of Building a Deck Railing?
We are going to show you how to add a standard wood deck railing to an already built deck. Deck railing projects might sound complex to a novice builder, but that is often a misconception, as with basic carpentry skills and a proper guide, you could construct a simple but attractive deck railing. Here is how you build a deck railing:
Plan and Design
The success of any project is always associated with planning. A deck railing plan would include the following key details:
- The style of the deck railing
- The overall size of the deck railing
You can work out these details on a rough piece of paper before proceeding to the design phase.
As an Amazon Associate I earn from qualifying purchases.
Designs help to convert the raw data in planning to sketches and drawings. During designing, you’re expected to cover details such as the deck rail height, length, and width. It’s also where you bring your style and vision into life.
Take Measurements and Gather all Materials
Follow the details in your design phase to take the actual measurements. Not only does doing so help you get a clear view of the intended project, but it also gives you a clue of how much materials you need. Get everything you need for the project, including the materials and building tools. Here are the tools that you might need for this project:
- Power drill
- Miter saw
- Circular saw
- Jig saw
- Clamps
- Tape measure
- pencil
You’ll also need the following materials to complete your project:
- 4x4x8 pressure treated posts
- 2x4x8 pressure treated rails
- 2x2x8 pressure treated balusters
- 2×6 pressure treated rail cap (length depends on how wide your railing is)
- Structural screws
- 2x pressure treated wood for blocking
- deck screws
- deck rail clips
Securing the Posts
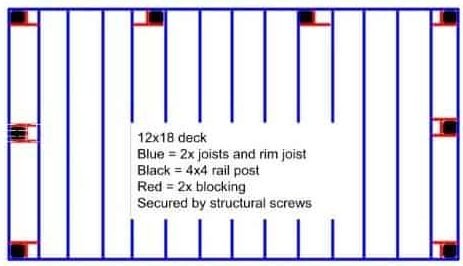
The deck railing is only as strong as its posts. This will be the most important part of building your deck railing. Locate the areas to place your posts on your deck. Your deck railing posts should not be more than 6 feet apart, but if possible lined up next to a joist for extra support. You will place your posts inside your deck outer rim.
Very Important!!! Do not notch your railing posts and/or install them on the outside of your deck rim joist. It is how it used to be done, but it has been shown to not be as sturdy. A good illustration from finehomebuilding.com website showcases our building method below.
You will need to take up the deck boards where your post will be located. You should take up several boards around the post. Cut your post for a height of 36″ + rim joist depth. Clamp post to rim joist, next to the joist. You’ll screw the structural screws through the rim joist to the post as well as through the joist to the post.
Once those are secure, place a piece of wood blocking between the two joists next to the post. This last piece of blocking will completely in case the railing post and make it very secure. An alternative to structural screws for the posts is to use a 1/2″x8″ carriage bolt long enough to go through rim joist, post and back blocking piece.
Attach side rails
Now you’re ready to attach your side rails to your rail posts. The most secure way is to use a deck rail clip. There are several different ones to choose from and it really comes down to the look you want. Simpson Strong-Tie clip is cheaper and mostly hidden, while the DeckoRail clips come in black but is a lot more expensive.
Measure the distance between your posts, then cut your 2×4 boards to that length. For the bottom rail, place your side rail on top of a 2×4 cut off piece to make your height 3.5 inches from the deck. Mark the rail’s location with your pencil and then screw your deck rail clips to your post. Slide your rail into the clips and secure to the clips with screws.
You’ll repeat the steps above to install your top rail even with the deck post. Make sure all side rails are level before installing.
Attach Vertical Balusters
The 2×2 vertical balusters are very simple to install to your side deck rail once you calculate how many you need between posts. Example, you have exactly 6 ft between your two posts. Remember you can’t have a 4″ gap between your balusters.
Your balusters are 1.5″ wide and you want less than 4″ gap, so we’ll say 3.5. You’ll divide 72 by 5, which gives you roughly 14 balusters. I like to lay my balusters out on top of my bottom rail to adjust the spacing to make them even.
Measure the distance between the top rail and bottom rail to cut your balusters. To make the balusters last longer, cut the bottom of the baluster at a 30-45 degree angle to help with water drainage. Use two 2.5 inch long deck screws to attach the baluster to top and bottom rails. Make sure the baluster is level vertically before attaching the 2nd screw.
Top Rail
The top rail is the last part to install for your deck rail. I have used 5/4 decking in the past since the edges are rounded already, but a 2x railing is better since it won’t twist or warp as much. In many cases you will need to cut two pieces to span the length of your rail.
You will make a scarf cut to attach the two top rail boards rather than a butt joint. A scarf joint is when both boards are cut at opposing 45 degrees that connect on top of each cut. You’ll secure your top rail with screws through to the top rail below every 8-10 inches.
Note: Remember to use pressure-treated lumber as it can withstand the weather and insects, giving the deck rail a longer lifespan.
Once the structure is done, you can accessorize it by painting or staining it to your liking. Make sure to maintain the deck railing by pressure washing regularly.
Conclusion
Deck railing is a great way of adding aesthetic appeal to your deck, even ground level decks, as well as a necessary safety feature for decks higher than 30 inches. Remember that building a deck railing starts with securely attached posts.
This is the hardest part, but worth it to have a deck railing that will last a long time. Hopefully, we have shown you how to build a secure deck rail and one that you will be proud to show off.


